zetaSID // learn: manuals and tutorials
Manuals
Follow the quickstart manual to correctly install your zetaSID, set up phybus cabling, and get your first patch playing.
The main user manual provides in-depth coverage of every zetaSID concept, menu page, and function.
Follow the quickstart manual to correctly install your zetaSID, set up phybus cabling, and get your first patch playing.
The main user manual provides in-depth coverage of every zetaSID concept, menu page, and function.
Download quick start manual:
zetaSID quick start manual v1 (5.12M)Download midiphy zetaSID user manual (version 1.4d)
zetaSID user manual v14d (4.73M)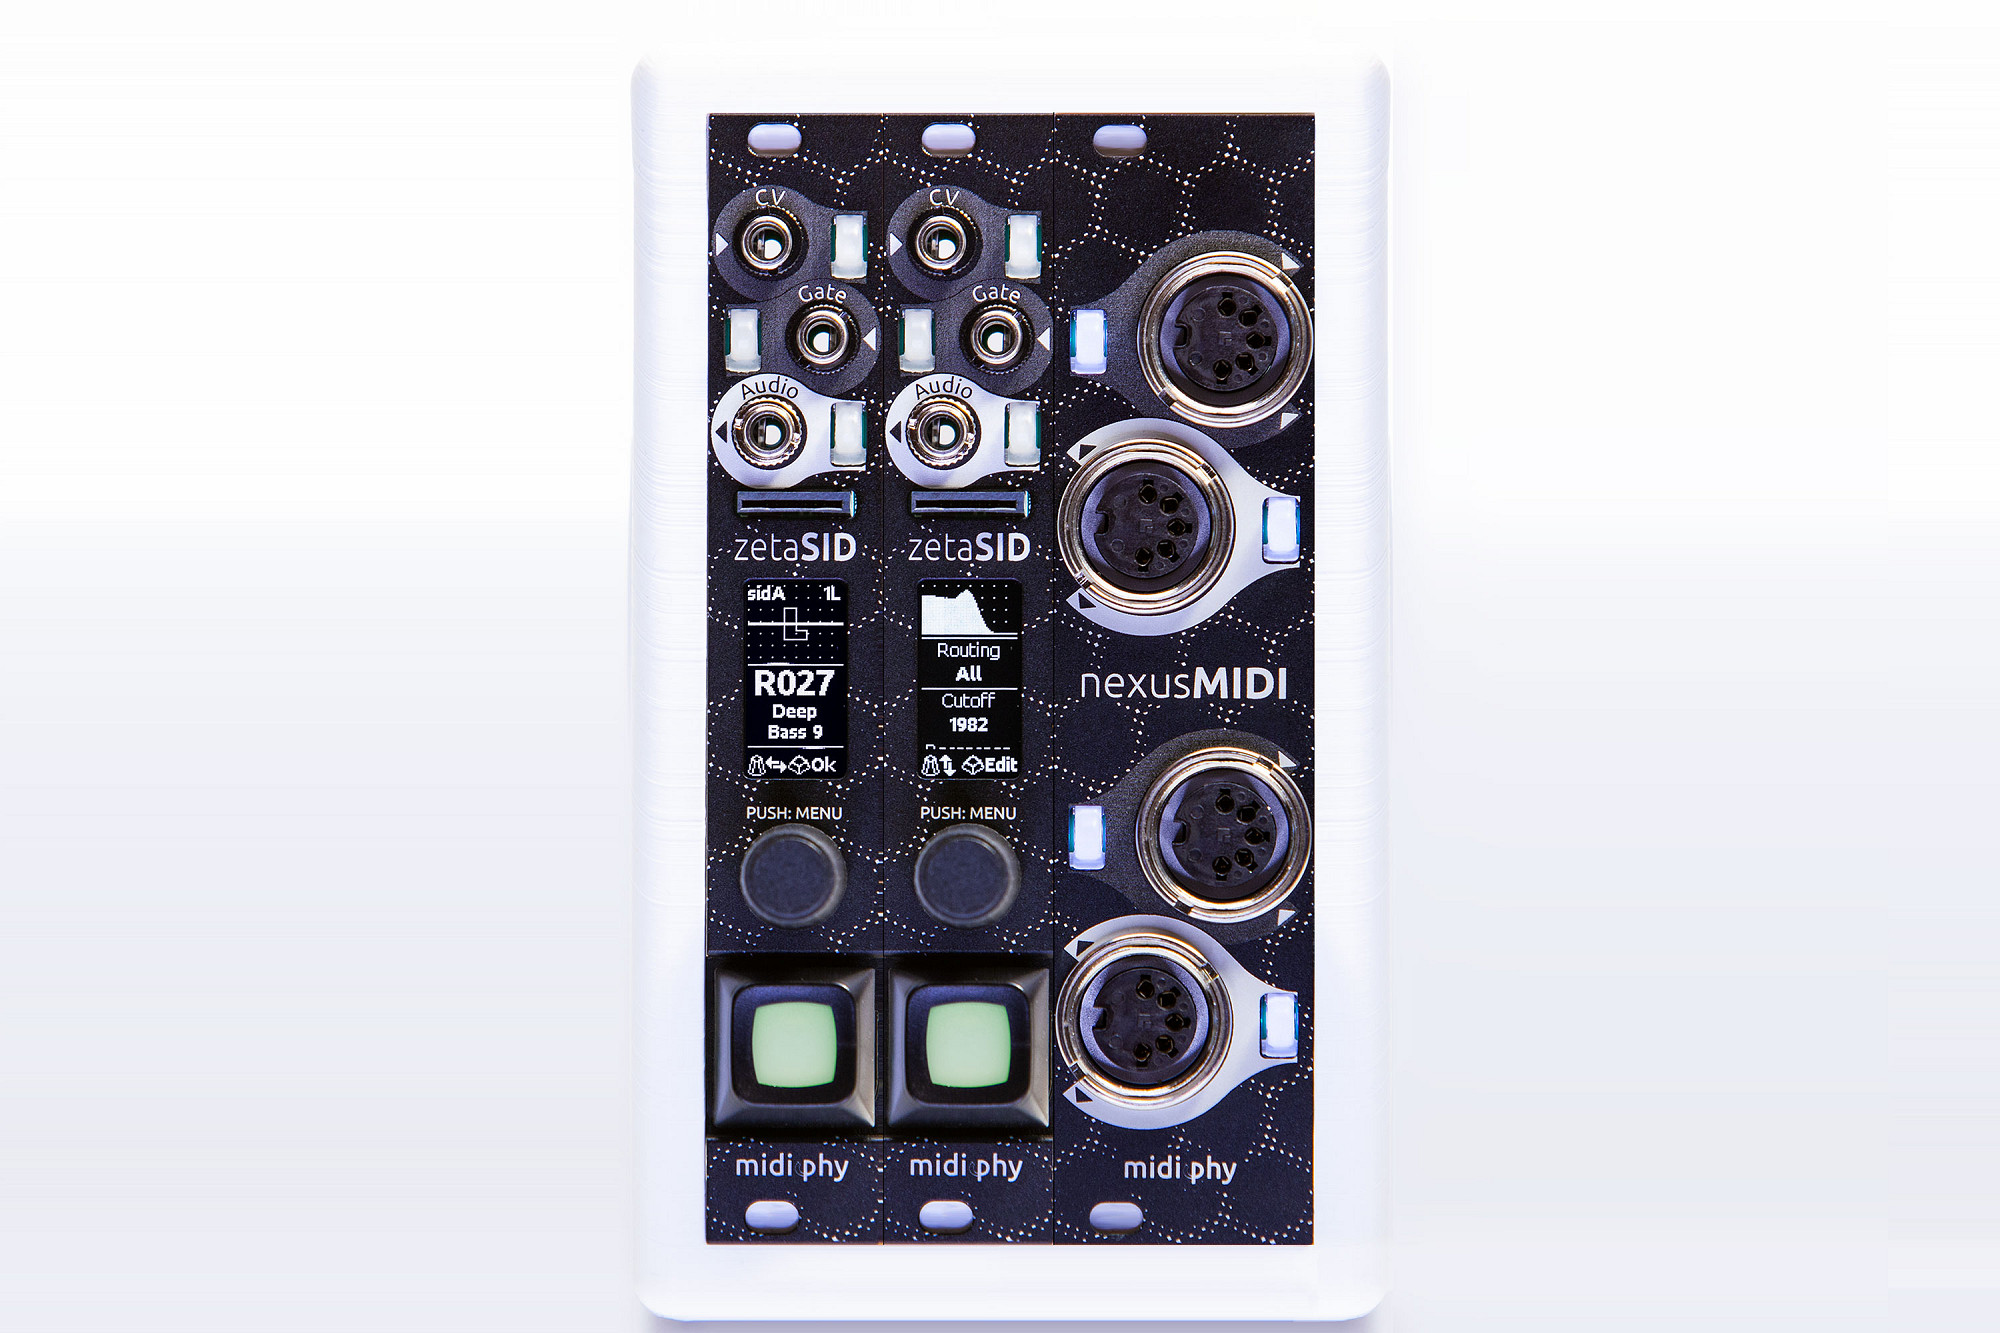
Quick start
1. Make connections and mount in rack
- Add phybus cables between modules (skip if only one module)
- Place exactly two bus termination jumpers: one on the first and one on the last module of a chain
- Plug in IDC eurorack power cables
2. Connect CV/gate sources
- 1V/oct CV source to CV In
- Gate source to Gate In
- Audio out to a mixer or output module
3. Power up and play
- Turn the encoder knob to scroll through the ROM bank patches
- Select a patch like "R010 Acid Blob"
- Play or sequence notes with CV/gate
4. Edit a patch
- Press the encoder knob to enter the menu
- Navigate to a section (e.g. Filter) by turning the encoder
- Press the key to enter, scroll to a parameter, press again to edit
- Turn the encoder to adjust, press key to confirm
- Press encoder knob to return to menu
5. Save your session
- Insert a microSD card to automatically save your current session
- Patches need to be saved manually after editing
phybus connections
The midiphy phybus system is a high-speed, expandable data protocol for low-latency routing of data streams, MIDI and CV/gate conversion. Connected modules can share user interface elements and virtual services.
Connection guidelines:
Daisy-chain adjacent modules using six-conductor phybus ribbon cables from PHY_R to PHY_L
Consider making all phybus connections before connecting power and mounting modules
Leave the outer PHY_L and PHY_R connectors empty
Place exactly two termination jumpers on the "end term." headers — only on the outer modules
Do not place termination jumpers on internal modules
When adding modules, move jumpers so only the two end modules are terminated
Maximum phybus network size: 16 modules
Maximum total phybus cable length: 150 centimeters
Power requirements
+12V: 120mA
–12V: 15mA
5V bus power is not required
Using standard 10-pin eurorack power header (–12V indicated by red stripe)
Module is protected from reverse polarity, but make connections with power off
Front panel features
CV In port
Range: –5V to +5V or 0 to 10V (configurable in Setup)
Default: 1V/oct scaling
Press the LEDome to splice this input to other phybus sockets
Gate In port
Accepts nominal +5V gate signals
Default: spliced to Note Gate input socket
Press the LEDome to splice to other compatible sockets
Audio Out port
Eurorack level audio output
Do not connect headphones directly
Press the LEDome to configure output settings
MicroSD card slot
Use FAT32 formatted cards (10/A1 speed or faster)
Stores sessions and patches
Auto-saves current session when inserted
OLED display
High-contrast display showing the local user interface
Expand with more zetaSIDs via phybus for additional screens
Encoder knob
Press to enter/exit menus
Turn to navigate and change parameters
Push-and-hold while turning for faster parameter changes
Illuminated key
Press to enter selected menu item or edit parameter
Press again to confirm and exit editing mode
Interacting with zetaSID
Playing the lead engine
Use CV/gate: 1V/oct pitch (0V = C3), gate triggers the output amplifier
Use MIDI: requires nexusMIDI expander, splice MIDI input to zetaSID
Playing the drum engine
Use CV/gate local ports for basic triggering
Use virtual trigger 1–4 input sockets for multiple drums
Splice gate inputs to Drum Trig 1–4 by pressing LEDome buttons
Use MIDI notes C3–D#4 to trigger drums 1–16 (requires nexusMIDI)
Menus and editing
Turn encoder to navigate between screens and parameters
Press key to enter screen or start editing (larger font indicates active editing)
Turn encoder to adjust parameter (push+turn for acceleration)
Press key to confirm change
Press encoder knob to return to main menu
Splicing and virtual patching
Press LEDome next to any port to start splicing
All phybus modules display the splice screen
Turn encoder on target module to select a compatible socket
Press key to confirm connection
One port can be spliced to multiple sockets
Query active splices by pressing the LEDome of a spliced port
Session and patch management
Sessions
Store up to 100 sessions on microSD card
Sessions save patch settings, link mode, polyphony, instrument ID, and socket options
Sessions auto-save continuously in the background
Switch sessions: turn encoder to select, press key to switch
Broadcast session changes to other phybus modules (configurable)
Patches
ROM bank (R) contains 100 preset patches
User banks A–H each hold 128 patches
Patches are saved as .syx files in the PATCHES folder
Save patch: navigate to Save, select slot, hold key for 2 seconds
Downloaded patches can be copied to the PATCHES folder on SD card
Link mode for polyphony
Off: standalone operation
Chief: controls patch loading and polyphony for the cluster
Agent: follows the chief for patches and settings
Up to 12 zetaSIDs can form an instrument cluster (6 stereo voices)
Chief and agents must share the same Instrument ID
Polyphony modes
Mono: single voice
Stereo: pairs two zetaSIDs for true stereo
Unison: link and detune multiple modules for fat sounds
ASID mode
Enables SID-file playback over MIDI
Try deepsid.chordian.net for browser-based ASID streaming
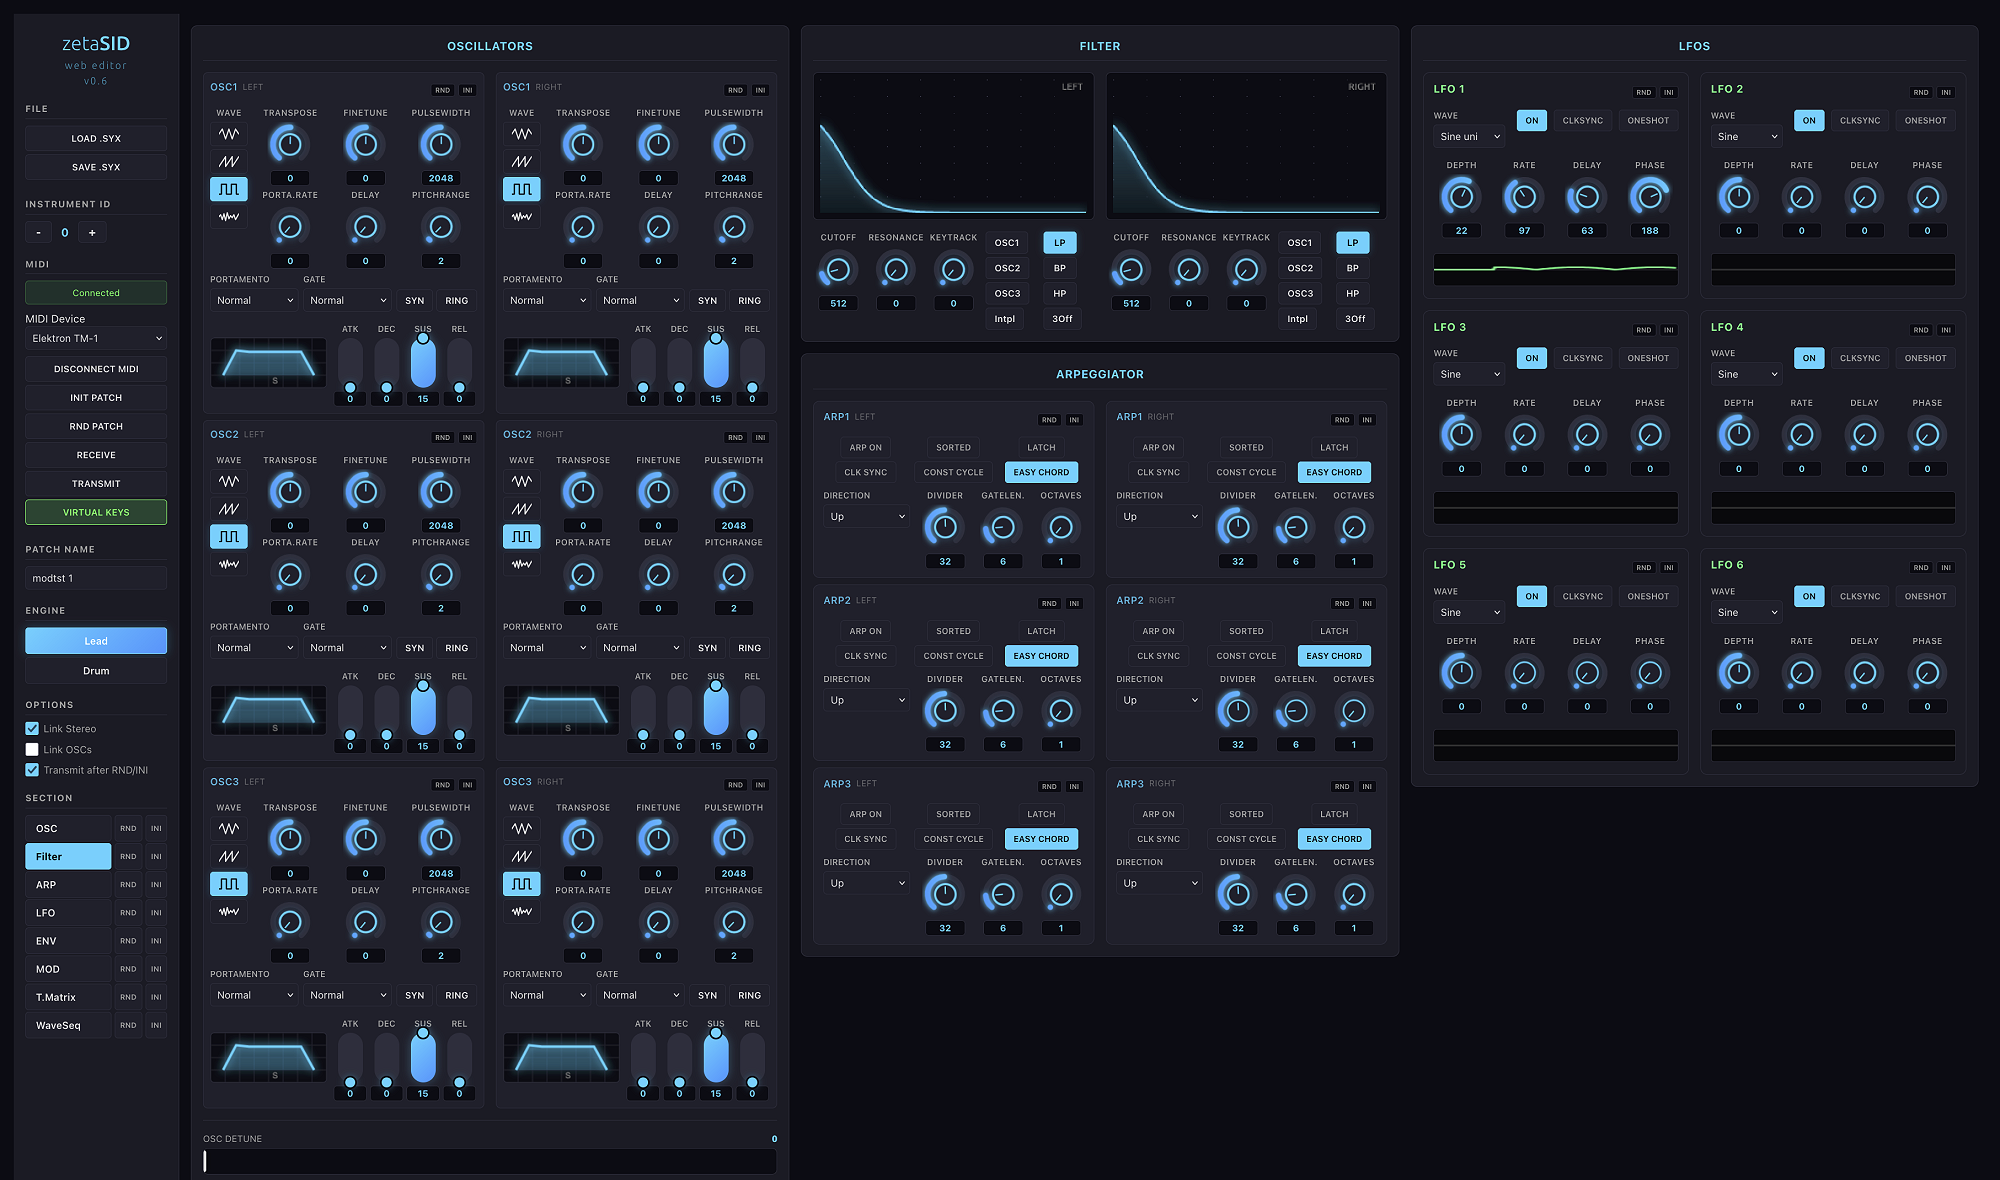
Editing patches with zetaSID web edit
If you are using a nexusMIDI expander, it is possible to directly edit all of zetaSIDs patch parameters with the midiphy zetaSID web editor found here:
Setup
Connect a USB MIDI interface to your PC/Mac and wire two standard MIDI cables: USB MIDI OUT to nexusMIDI IN2, USB MIDI IN to nexusMIDI OUT2
Press the LEDome key next to nexusMIDI IN2 and create splices to the "MIDI IN2" sockets of all zetaSIDs (set up individual splices for each zetaSID)
Press the LEDome key next to nexusMIDI OUT2 and create splices to the "MIDI OUT" sockets of all zetaSIDs (set up individual splices for each zetaSID)
(If you're using microSD cards in the zetaSIDs, splices will be saved automatically)
Usage
Use "LOAD .SYX" and "SAVE .SYX" for file operations - loading existing patches or saving your patches to disk
Set the Instrument Id to match the Instrument # on your Chief zetaSID
"Connect" the USB MIDI device
You can now receive and transmit patches, as well as randomize and rename them
If you have no other MIDI or CV/Gate inputs connected, you can use the virtual keyboard to play notes for testing the patch
Link options
Use "Link Stereo" to link a single oscillator with its stereo counterpart on a neighboring zetaSID when the Chief has Polyphony mode set to "Stereo"
Use "Link OSCs" to link all three oscillators on one stereo side of the patch
Sections and panel use
Click any section name to scroll directly to that section, e.g. Filter
Use the randomize and initialize buttons next to section names to randomize/initialize only that section
Use the randomize and initialize buttons on each panel (e.g. OSC1 LEFT) to randomize/initialize only that part of the patch
Tips
Save early, save often - you can always download nice-sounding patches as .syx files, especially before making major changes
When experimenting with randomization, enable "Transmit after RND/INI" to automatically send the patch SysEx to hardware after each randomization operation
Remember that you can randomize individual panels - e.g. drum voices - allowing you to build a custom drum kit by randomizing individual drum sounds until you find ones you like.